Constructing an appropriate fence for your pet demands a huge investment of your time, energy, and, most importantly, financial resources for the supplies. Why struggle with those inconveniences when we are living in the modern age, where science is the most advanced and progressed?
Halo Wireless fence is the easiest and most efficient approach to give your dog a training area without a lot of effort. These fences are easy to set up, which is one of the primary reasons individuals choose them over underground wired fences.
Remember that the basic steps can be different from one model to the next, but the basic idea will always be the same.
Find the Ideal Location for the Transmitter
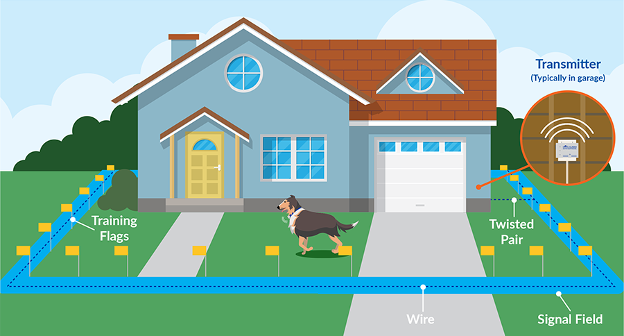
The transmitter is the hub for all wireless fence gadgets and the geographic centre of your pet zone. No matter where you place the transmitter, the centre will be there by default. Choosing the ideal location for your equipment is important.
So the unit should be powered by an outlet within your home. It should be close to the outside, near the door or window.
It needs to be placed in an area free of obstacles like concrete walls and other metal objects that could interrupt its signal. Signals will enable the device to warn your dog in an unexpected setting.
These are a few points to consider when deciding where the transmitter should be placed. The device must be able to be powered by an electrical outlet nearby. The best place for the transmitter is next to an outside wall since the signal it sends out will be weakened by concrete walls.
So, the transmitter should be put at least 5 feet away from metal objects. On the ground floor of your house, it should be 5 feet above the ground.
Turn On the Collar’s Signal Detector
Most of the time, you’ll need to put in a battery first. Some models feature one-time-use batteries that usually last between one and three months. Other collars can be charged directly or come with battery cells that can be taken out and charged separately.
These collars normally last 3-4 days before they must be charged again. After installing a new battery, the wireless fence collar will be turned depending on the model you have. The last step is to turn on the signal transmitter with the pet’s collar.
Set the Range of Your Area
Your wireless dog fence’s maximum radius will be 90–250 feet. Some models in the market have the longest radius and most stable boundaries. Two people can do this job perfectly. One will stay in the garden, holding the receiver collar at about the same height as your dog wearing it.
The second person in the garden should stand right where you like the circular boundary of your wireless fenced area. Then he will shift the pet’s area until the collar starts to beep. The one in the yard will instruct the other person to stop adjusting the radius parameter.
In this way, you can determine the optimal confinement area of the fence.
Plant Flags after Area Setup to Make Fence Visible for Yourself
Your dog’s containment area is the range from the transmitter within which he can walk safely. This area can be either rectangular or circular, depending on the layout of your residence. There should be something inside which can tell where the limits are set. You can use flags for this purpose.
You can also use a receiver device for this, but it will be an expensive option.
After you’ve set the area, use the receiver collar to put flags at the edges. Ensure the collar’s height is the same as the dog’s neck. It would be best to turn on the tool; it will alarm and light up when it gets to the edge. Then you can put the flag right there.
Place the Receiver Collar around your Pet’s Neck
After installing, activating, and putting up all the necessary tools, it’s time for your dog to wear the collar. First, let them sit in a way that is most comfortable for them. The collar should be properly positioned with the controller pointing forward.
Last, put two fingers under the collar to ensure it is not too tight and not choking your dog. If your dog has super dense hair, you use the extended contact probe that is included in the package. If this does not solve the problem, you should consider trimming your dog’s hair.
If your dog is still unresponsive and acting the same as before, you should replace the collar. It may be too loose. Ensure the receiver collar is perfectly buckled to your dog’s neck for perfect results.
Conclusion: Your Dogs Safety Should Come First
Some pets have super sensitive skin. Do not leave fence collars on them for too long. Remove and clean the receiver collar off his neck to keep your dog safe and prevent skin irritation. This device will make training easier and prevent your dog from roaming outside your property and upsetting your neighbors!
Related Reading


